Directions & Instructions
Windshield / Windscreen Repair Manual
This manual provides professional step-by-step instructions for repairing windshield chips, bull’s-eyes, and star cracks using the Windscreenfix Windshield Repair Kit.
Step 1 – Surface Preparation and Applicator Placement
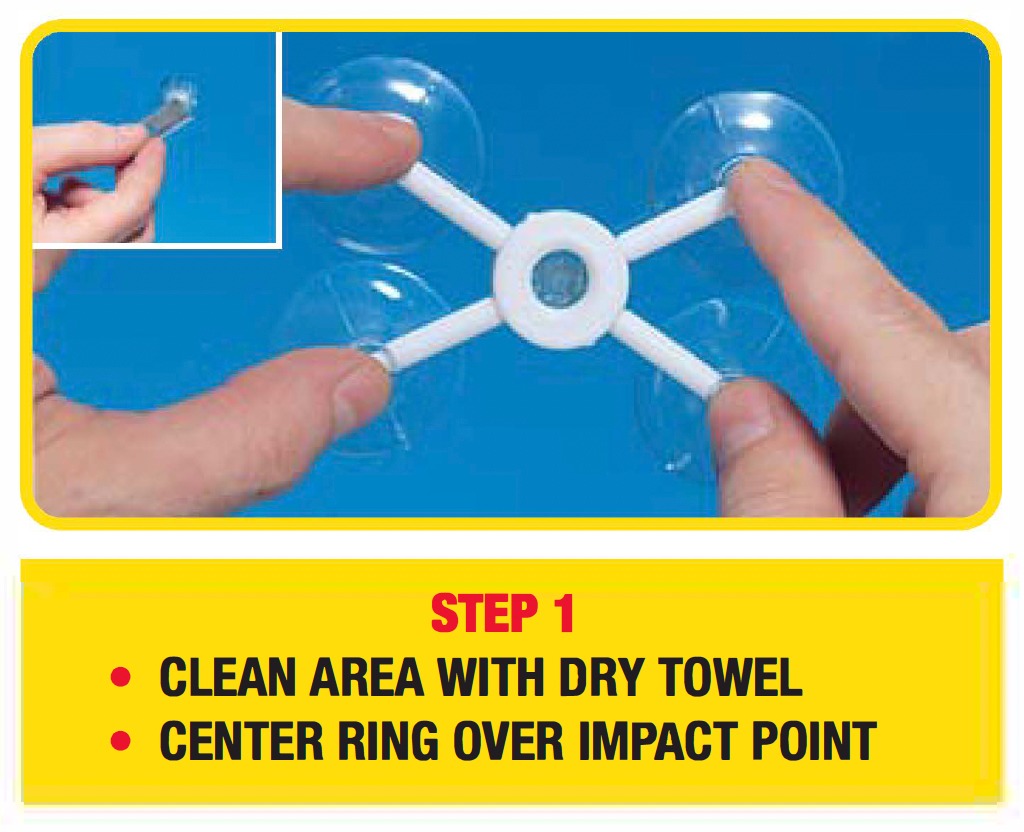
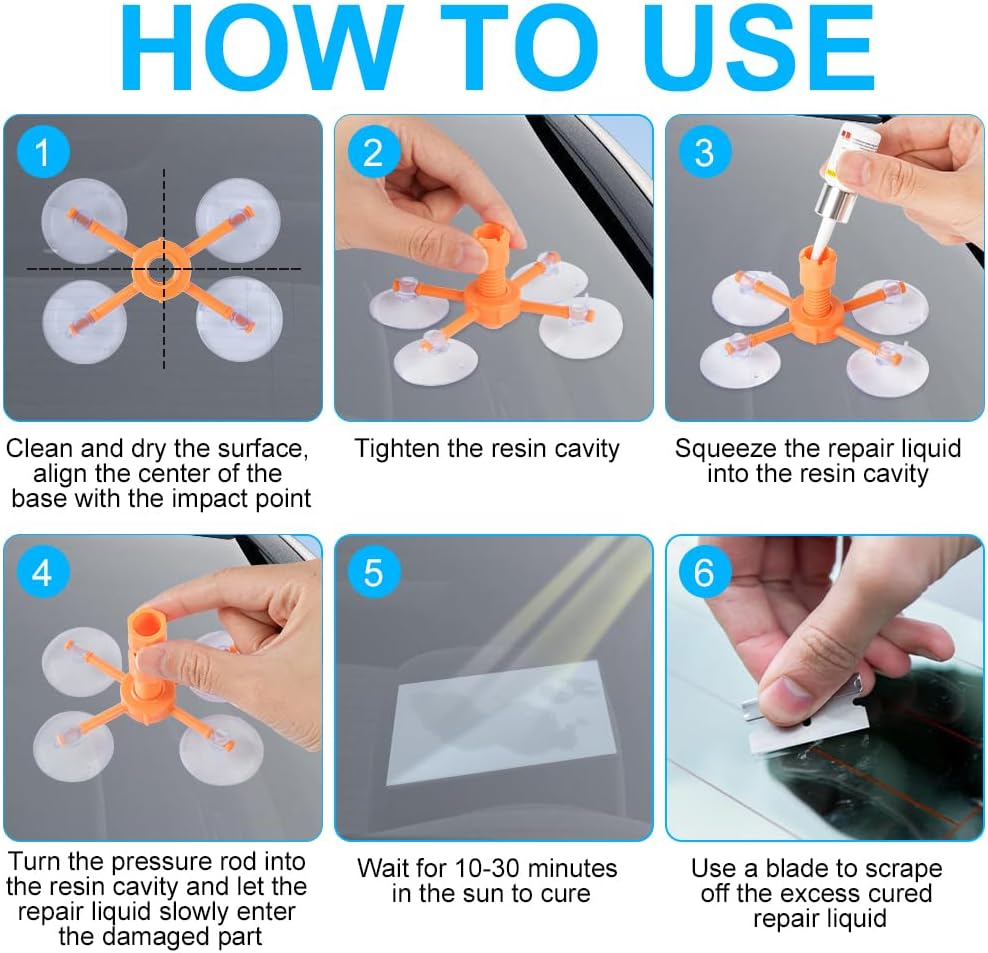
Clean the damaged area thoroughly using a dry paper towel. Remove any loose glass fragments with the supplied razor blade. Position the applicator base over the damaged area, ensuring the center ring aligns directly with the impact point. Press the suction cups firmly onto the windshield without covering any cracks extending from the damage.
Clean the damaged area thoroughly using a dry paper towel. Remove any loose glass fragments with the supplied razor blade. Position the applicator base over the damaged area, ensuring the center ring aligns directly with the impact point. Press the suction cups firmly onto the windshield without covering any cracks extending from the damage.
Step 2 – Resin Chamber Alignment
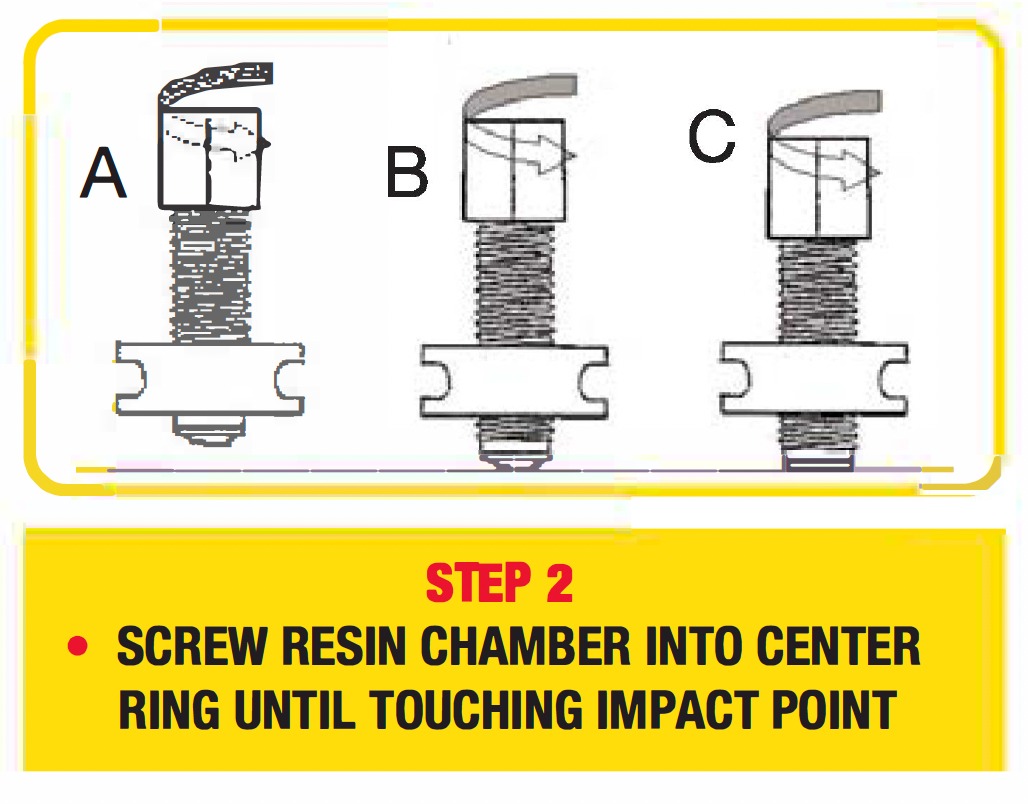
Install the resin chamber into the applicator base. From inside the vehicle, verify that the rubber seal is positioned directly above the damaged area. Carefully tighten the chamber until the rubber seal rests gently against the windshield. Avoid excessive pressure, as this may affect resin flow and repair quality.
Install the resin chamber into the applicator base. From inside the vehicle, verify that the rubber seal is positioned directly above the damaged area. Carefully tighten the chamber until the rubber seal rests gently against the windshield. Avoid excessive pressure, as this may affect resin flow and repair quality.
Step 3 – Resin Application
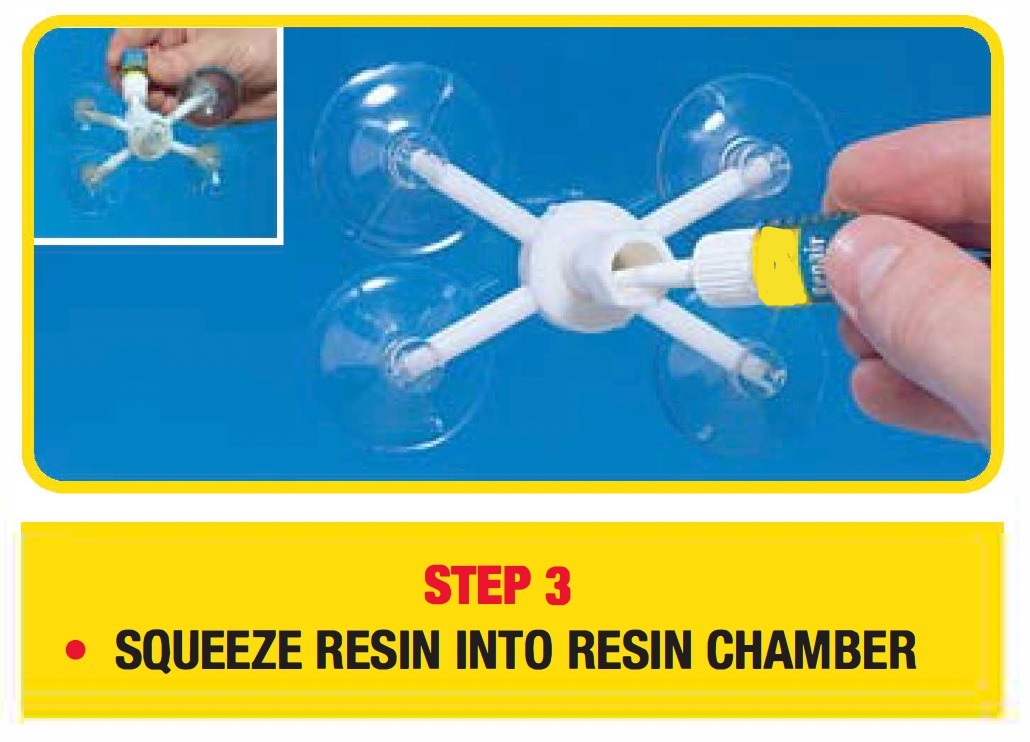
Apply 3 to 6 drops of repair resin into the chamber, depending on the severity of the damage. If resin leakage occurs, tighten the resin chamber slightly until the leak stops.
Apply 3 to 6 drops of repair resin into the chamber, depending on the severity of the damage. If resin leakage occurs, tighten the resin chamber slightly until the leak stops.
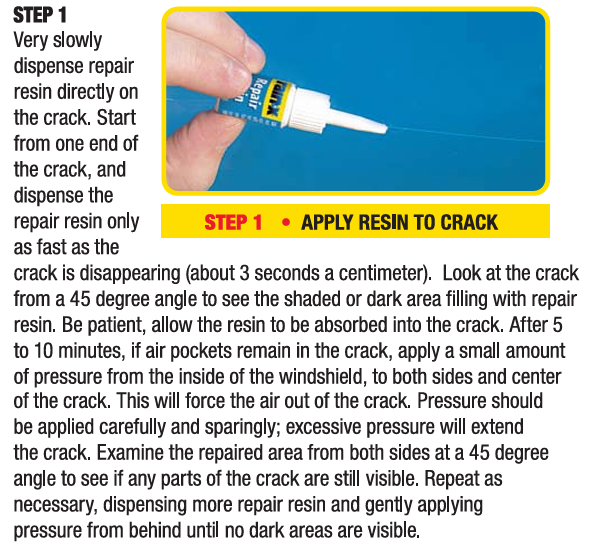
Step 4 – Pressure Injection
Insert and tighten the pressure driver clockwise to force resin into the damaged area. Allow the resin to penetrate the break for approximately 4–6 minutes. For difficult repairs, gentle heat may be applied from inside the vehicle using a hair dryer or hot air gun.
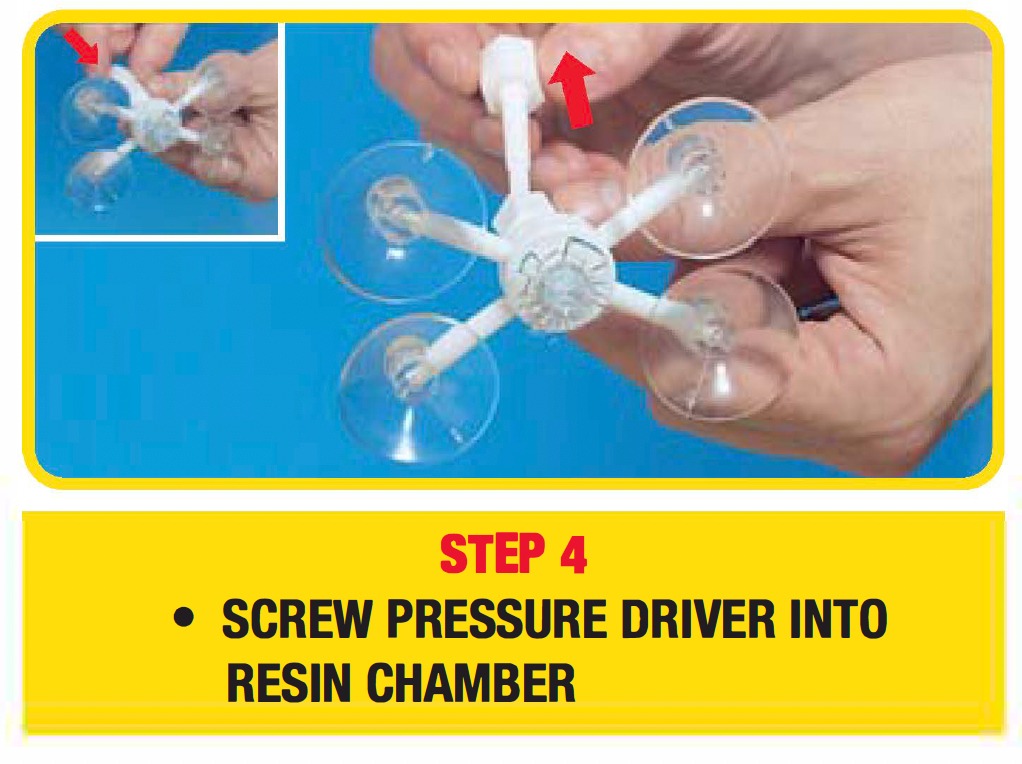
Insert and tighten the pressure driver clockwise to force resin into the damaged area. Allow the resin to penetrate the break for approximately 4–6 minutes. For difficult repairs, gentle heat may be applied from inside the vehicle using a hair dryer or hot air gun.
Step 5 – Air Removal and Inspection
Remove the pressure driver briefly to release trapped air, then reinstall and tighten it again. Inspect the repair from different angles to confirm all air bubbles have been removed and resin has fully penetrated the damage. Repeat the pressure process if necessary.

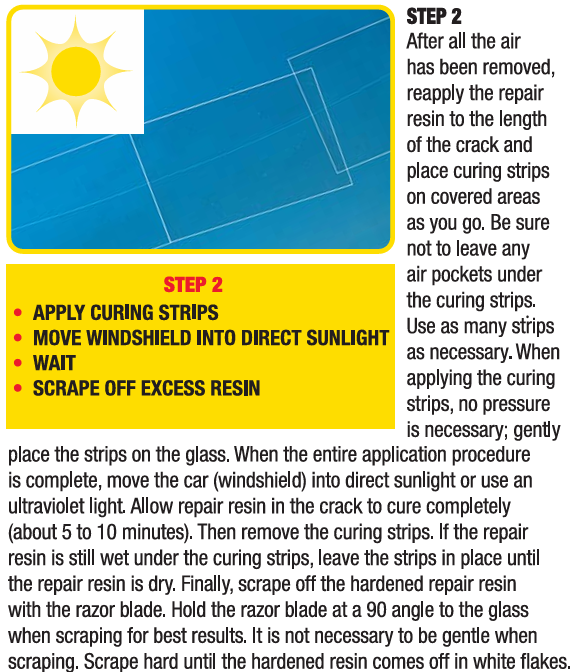
Step 6 – Finishing Application
Rotate the applicator assembly slightly counterclockwise and remove it from the windshield. Clean away excess resin carefully. Apply a final drop of resin to any visible imperfections and place a curing strip gently over the repair area.
Rotate the applicator assembly slightly counterclockwise and remove it from the windshield. Clean away excess resin carefully. Apply a final drop of resin to any visible imperfections and place a curing strip gently over the repair area.
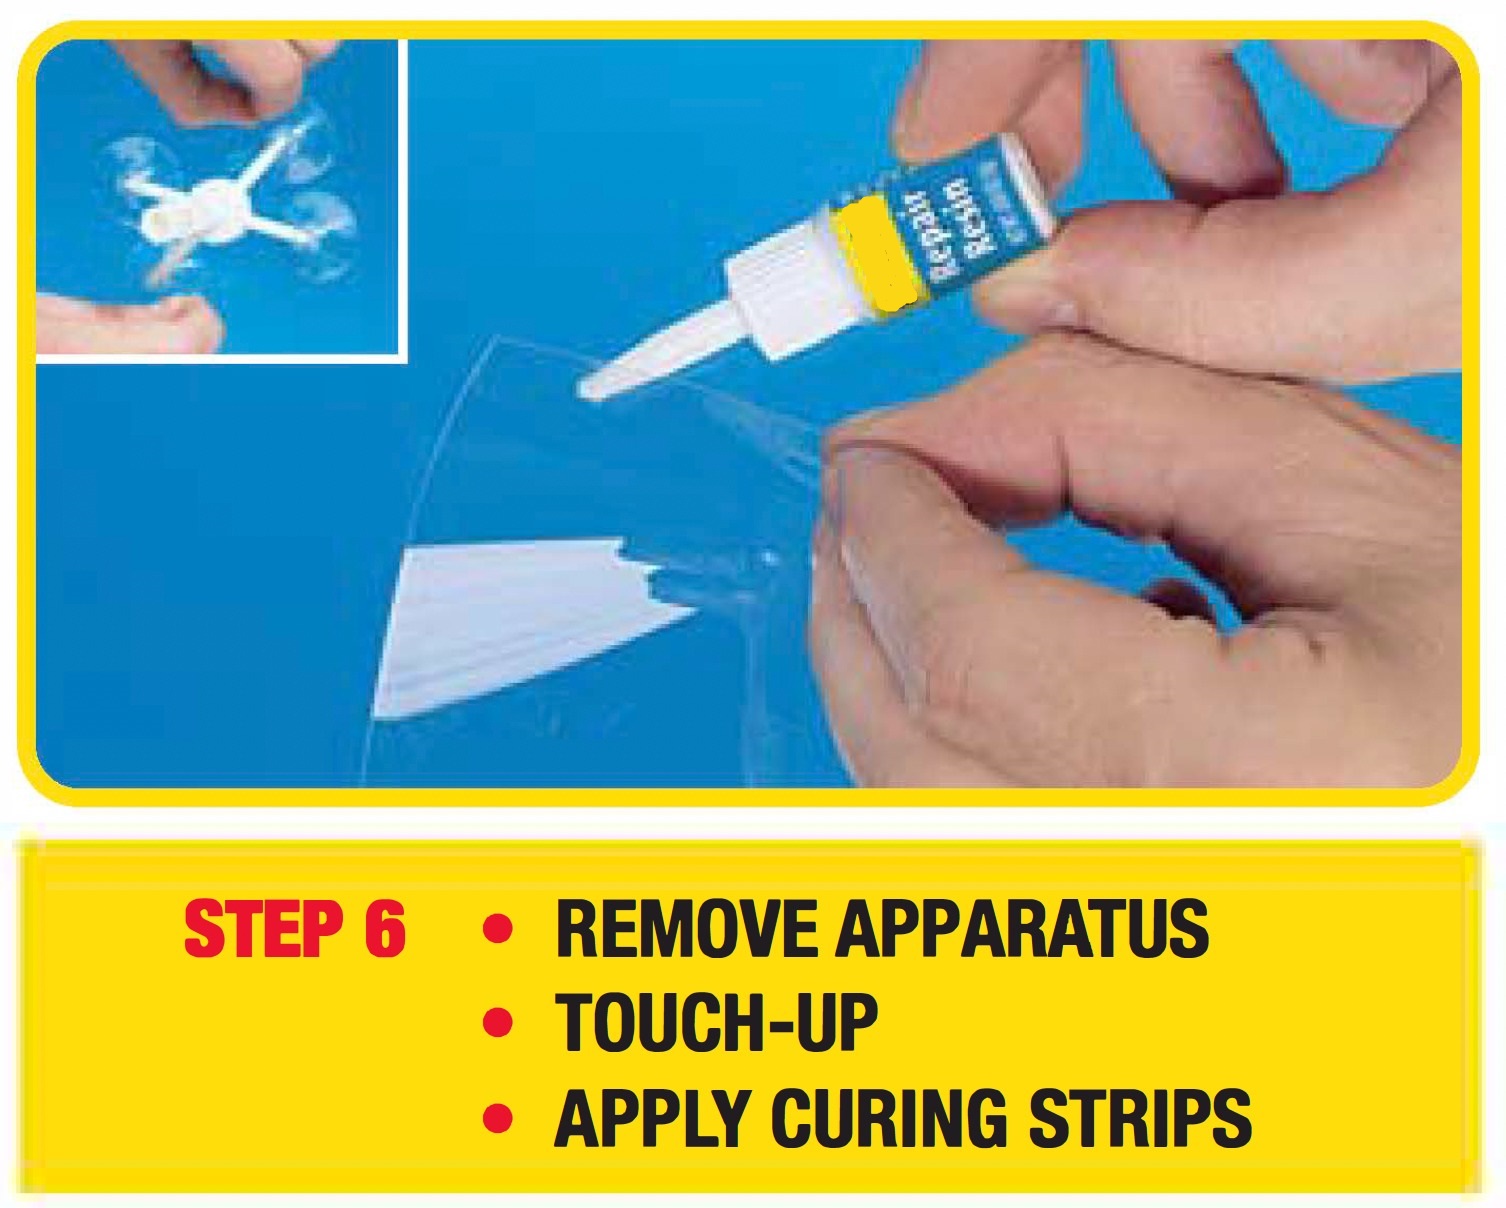
Step 7 – Resin Curing
Expose the repaired windshield to direct sunlight or ultraviolet light for approximately 5–10 minutes until the resin is fully cured. Remove the curing strip and scrape away any remaining excess resin using the razor blade.
Important Safety and Usage Notes
• Perform repairs as soon as possible after damage occurs.
• Keep the windshield out of direct sunlight until the repair process is complete.
• Do not overtighten the repair apparatus.
• Use caution when applying heat to the windshield.
• Ensure all air bubbles are removed before curing.
• Perform repairs as soon as possible after damage occurs.
• Keep the windshield out of direct sunlight until the repair process is complete.
• Do not overtighten the repair apparatus.
• Use caution when applying heat to the windshield.
• Ensure all air bubbles are removed before curing.
Repairing Long Cracks
Long cracks require additional attention to ensure proper resin penetration throughout the damaged area. For best results, begin the repair process at the impact point and work progressively along the crack.1. Clean the crack thoroughly and remove any loose glass fragments.
2. Apply repair resin directly along the length of the crack where required.
3. Use gentle pressure to encourage the resin to flow evenly through the crack.
4. Lightly flexing the windshield from inside the vehicle may assist resin penetration.
5. Continue applying resin until the crack appearance becomes significantly reduced.
6. Cover the repaired area with a curing strip and expose it to ultraviolet light or direct sunlight for 5–10 minutes.
7. Remove the curing strip and scrape away excess cured resin using the supplied razor blade.
Professional Tip
Very long or complex cracks may require multiple resin applications. Windshield repairs improve structural integrity and visibility, but severe damage may still require windshield replacement.
Directions - Cracks
Repairing Long Cracks
Long cracks require additional attention to ensure proper resin penetration throughout the damaged area. For best results, begin the repair process at the impact point and work progressively along the crack.
1. Clean the crack thoroughly and remove any loose glass fragments.
2. Apply repair resin directly along the length of the crack where required.
3. Use gentle pressure to encourage the resin to flow evenly through the crack.
4. Lightly flexing the windshield from inside the vehicle may assist resin penetration.
5. Continue applying resin until the crack appearance becomes significantly reduced.
6. Cover the repaired area with a curing strip and expose it to ultraviolet light or direct sunlight for 5–10 minutes.
7. Remove the curing strip and scrape away excess cured resin using the supplied razor blade.
Professional Tip:
Very long or complex cracks may require multiple resin applications. Windshield repairs improve structural integrity and visibility, but severe damage may still require windshield replacement.


Showing 1 to 4 of 4 (1 Pages)
![]()
Safe & Secure Online Shopping.
Our website is 100% Encrypted and Safe!